Saturday, September 29, 2012

Fix the Shower for Sanity

Well, it's been about a week since I last had an update to the blog and my sister is getting a little antsy for a new post. This week's episode is about water/bathing to be specific.

When we moved in the house was in a state of slow decline. No maintenance done since the dawn of time. And when the moving clan needed to take a shower the only real option was to jump into the shower upstairs (shudder). You know what it's like to bathe in a really clumsy, leaky and corroded shower? Not fun. Each time I showered I couldn't help notice that the drywall was delaminating, the paint bubbling and peeling, and the water was finding its way past the tub into the cracks and crevices down into the walls and Lord knows where else.

Step 1: Cover the peeling and bubbling paint/holes in the shower sidewall with a plywood board. Paint and caulk around it to prevent further deterioration. Done.

Step 2: Caulk all the cracks and crevices so that water remains trapped in the tub and shower area until it dries. And around these parts it dries in about five minutes! Done.

Step 3: Remove the nasty old hand-held shower wand that won't stay on the sliding rail that is located right in the middle of the wall so that no matter what you do you knock into it constantly. Did I say it was kind of yucky? Done:

Step 4: Clean the entire shower and tub. Make the faucet really shine. Descale the thing. Shine up the curtain rod. Done.

Step 5: Paint the sheetrock with a high quality Ben Moore Semi-gloss white so that it won't let water past. Done.

Step 6: Install a shower head that works and puts the water where you want it. Done. Shower is now light years ahead of where we were.


Notice how the shower is located such that the window is intruding into the space. This is the reason why this room is going to need a total makeover. But it is not this day!

We brought a shower head from home with us that we had bought and used before. Once in love with a shower head its's a hard habit to break. I also mounted it in the fashion that it was intended to be used: Straight overhead. It is a rain maker. I removed the water saver plug from the head for even more of a deluge. Hey, we got water rights here in Idaho! (another story there)


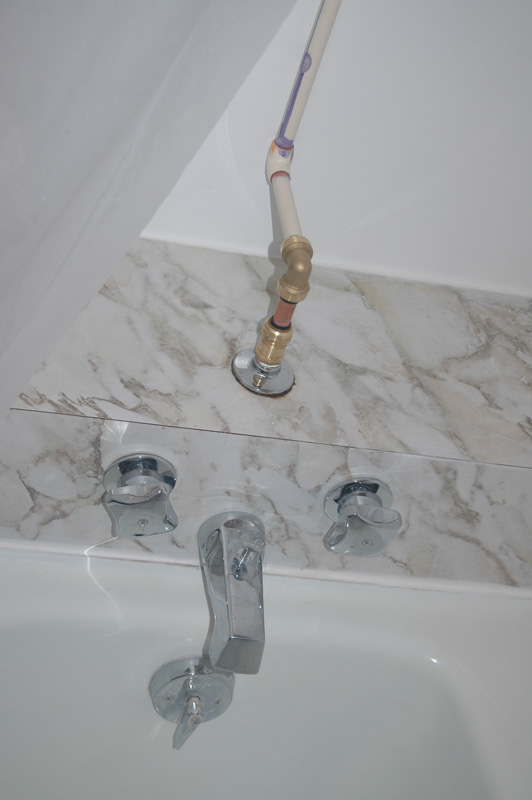
I used some brass GatorBite tm fittings to route the water up and over to the ceiling. These fittings allow removal and reuse later when we decide to sink more money into the pit. You know, buy a house , then tie a cinder block around your bank account and throw it into the hole. Wave good bye...


See that shower head? YOU NEED ONE! And mount it overhead. It ROCKS! I now come out of the shower only after the hot water is depleted. And the flow of water makes it seem like Niagara. It's also about 6 inches ABOVE my head. No more taking a shower on bended knee. I hate having to bend over in order to get my head wet. Water goes in my ears and other wrong places. Now I am in shower nirvana. Might be a while before the bathroom gets renovated...

Next installment? The workshop gets a boost - Or how can we get this crap we bought that weighs five hundred pounds off the truck - or Hey! There goes that guy that still has that planer in the back of his truck. Until then, as they say where I'm from, "See ya, don't cha know."

Monday, September 17, 2012

Painting is Almost Finished

Today was a beautiful day in Southeast Idaho. Well, almost everyday is a beautiful day here! What makes it really nice is to pull into our driveway and find a new looking house, all due to the absolutely stunning paint job we put on it. So to celebrate Karren and I sat out on the front porch and imagined how many mosquitos would have bitten us within the hour that we were exposed (if we were still in Virginia). It's odd, but we are more at risk of being bitten by stinkbugs or stung by wasps than bitten by mosquitos here. It is actually possible to sit outside and enjoy the evening - remarkable. So, here's a picture of Ma 'n Pa out on the porch. Sorry for the poor light but it was after sunset.


If you are really observant you will notice something in the picture that has been missing in most all the others in this blog. Clouds! Yeah, we almost had a few rain drops fall on us tonight but it was not to be. Soon after this was taken the sky cleared and the stars began to shine.


What you can't see is that we installed a new front porch light and flood light on the side of the garage entrance. Of course the red door is plainly evident. Some interior modifications were also performed, including painting the kitchen door and installing the large rain maker showerhead directly overhead in the upstairs bath. I love it when I can get under the shower head without bending over.


Well, we are still planning the next phase of construction/renovation so stay tuned. It will probably be either the roof or the floor in the bedrooms upstairs. We gotta get out of sleeping in the basement soon! By the way, the negative ion generator is turning the moldy smell in the basement bathroom into a distant memory. I should have ordered that when we first arrived. I am super excited about how well it is working.

See you in the next installment of the Streagle Chronicles!

Thursday, September 13, 2012

May I Cut-In?

Yes, the era of the paintbrush is almost over. Today marked the end of cutting-in the finish coat of exterior house paint. The finish color is quite a bit darker than the primer. The primer was tinted a suitably brown color to help hide any thin spots but I wanted it light enough so that I could tell what was primer and what wasn't. Here's a shot of the place with Karren in front (she said it needed human interest).


Keep in mind that half of this house is in the ground. I tried my best to keep the paint off the concrete so I have cut in the lower border of the siding as well. We've still got to get the remaining juniper bush cuttings hauled off to the pasture, but it is such hateful stuff that neither one of us wants to do it.

Check out the snow guard on the basement window. This prevents snow from piling up and blocking the ventilation from the window. We are sleeping in that bedroom at the moment. Having only one low window on this side is a good strategy to keep the heat inside. This is the western exposure and this is where the weather and wind seems to come from. Perhaps the junipers were planted with this in mind, but I'd rather have them gone. The bug population inside has been GREATLY diminished since they were removed.


The progress is slow, but several of the repairmen that have visited have remarked how much better the place looks. Speaking of repairs, our new Samsung refrigerator had a leak out of the icemaker in the door so it has been under repair since early August. The repairman tried new parts but eventually found that there was a crimped wire in the sidewall that is inaccessible, causing the problem. Lowe's called today and said that the manufacturer is sending a newer model (the one we bought was a closeout special at about $800 off!) with the same features out for delivery to us on Saturday. Wow! The salesman said the new one has even more advanced features. Well, as long as it WORKS I'll be happy. You go Samsung!

Another look at the front door with the new home owner proudly standing on the porch. We have a long way to go before this house is fixed the way we want, but we are making headway. Next task? Spray the finish coat. We'll probably do that on Saturday.


Tomorrow I am going to begin tearing out the basement shower and mildew factory. We have an Ionizer being delivered on Friday and I want it to have access to all the bad ju-ju bugs it can handle. Besides, tonight it is scheduled to drop to 27 degrees here, and the paint won't like being sprayed that cold. So the plan is to do some demo and fact finding. I think I'm going to enjoy the demo but I'm going to need to wear a respirator to keep from ingesting the gook. See you in the next installment of "This Old Idaho Refugee Home!"


Sunday, September 9, 2012

Primed and Ready!

Today is Saturday and Karren is home! YAAY! She was a big help today and we really did some good work around the homestead. First, it was off to the landfill to deposit all the old galvanized guttering we had ripped off the house last week. Throw in a few (3) satellite dishes and one NASTY swamp cooler for good measure. Bill (the guy that runs the dump) didn't even charge us for throwing out the old coax wire. Out with the old and in with the new!

Once we satisfied our lunch cravings with a couple of corn dogs and hot wings from the Flyin' J truck stop we headed home for our next task. Prime the house. Armed with our new Graco paint sprayer we set to spraying paint wherever it would stick. Four hours later we were finished and almost out of primer paint.

The sight of a monochromatic house color almost makes one weep! We saved enough paint to coat the side walls of the center sections (above the roof) but we'll not do those until we move to the roofing operation. I'm still not sure how much of the roof flashing is in good shape and we may have some siding to remove/replace up there. No reason to waste paint there.

We also left the chimney out of the equation because it is slated for demo as well. Gee, the place is beginning to look like I could live there...


There was enough paint left to give the well house a quick coating too. That's it to the right of the blue trash can. It needs new shingles next.


After cleaning up I cooked a steak on the grill and we ate dinner. The quality of beef out here is outstanding. Sitting out in the front yard (sans mosquitos) afterward was sublime.

Perhaps we'll get the finish coat cut-in tomorrow? Maybe we'll just take the day off. Sure is tempting to play hooky. See you all in the next installment of this old Idaho Shack.


Wednesday, September 5, 2012

A few Scrapes and a Good Washing

Yesterday (appropriately enough, Labor Day!) Karren and I power washed and scraped the entire exterior of the house, except for those portions of the wall that are on/above the roof. I plan on pulling the sidewalls off above the roof to run the trim flashing under them, so no reason to do anything to the siding there when I can paint them on the ground later.

Scraping paint is what I would suggest for the dudes being kept at Gitmo, more or less severe and distasteful. The relief felt when finished is palpable. Now I will caulk and putty the voids and seams before painting. I will also caulk after priming as well. A good paintable latex-silicone hybrid caulk is called for in this application. This will be the last paint job this house ever gets if we are still living in it. Eight years from now it will receive a metal covering and all trim will be covered as well.

Here is a view of the front right corner of the house. This place needed paint about 5-10 years ago. Don't let your place get like this! If this had been located in Virginia it would be rotted away in places. As it is I will only need to replace one piece of window trim that trapped water and has about 2 inches of soft wood. The window trim is redwood and is remarkably resistant to deterioration.

Front right:


Rear south (the same end but rear view):


Karren proved her mettle by removing the "swamp cooler" from the rear of the house. She likes doing demo work and has a real talent for it! "Bust it up, girl!" I have to keep an eye on her when she is in the throes of the destruction so that there is some house left.

We are now debating the removal of the cinderblock chimney due to some"issues" it has. Some of the blocks have been shifting over the years and based on the rest of the dwelling I don't trust that it has been inspected or maintained either. Another benefit is that the new roof will not need a "cricket," or water diverter upstream of the chimney penetration. We plan on a modern, stainless steel chimney that will heat and draw more efficiently for our stove.

Gotta get going on the work. The Rocky Mountain Power meter-reader was just here and he said freezing temps at night are just around the corner. See ya' later!


Monday, September 3, 2012

Gearing up for the Paint Job

Today Karren pulled half the gutters and all three satellite dishes off the house while I got self absorbed in trying to straighten out the garage. She fought with the bees that were nested in the dishes and I fought the never ending fight with gravity, keeping boxes from falling down off the stack (I always seem to lose fights with gravity). The Big G is my nemesis.

We are going to remove the rest of the guttering tomorrow and get started powerwashing the house in preparation for the painting. Yesterday we removed the rest of the HATEFUL juniper bushes and drug them into the field out back. the house is beginning to look much better even without the new paint.

For those who would like to know, I ordered the paint from our local Ace Hardware dealer, who happens to be the only Benjamin Moore dealer in this area. I have painted lots of things in my day and I have settled on Ben Moore paints as being the best on the market. If you are going to pay over $35 a gallon for premium paint anyway, you might as well get Ben Moore paint. It is the best looking and has the best longevity of any paint I have used. I've tried Duron, Sherwin Williams, Porter, Behr, and Olympic, and rate them in order of preference, best to worst. Ben Moore's premium house paint is called "Ben" and is really good stuff. If you are in a more developed area you can also use their commercial grade, "Super Spec," which is almost as good and is slightly cheaper.

The house must be primed because I am changing the color from gray to a dark brown. There is also some spot priming to be done because there is a lot of bare wood showing due to plants rubbing and such. Lots of flaking as well and this will require steel brushing and scraping. There is virtually no paint left under the gutters which necessitated their removal, but they were rusting through so no loss there.

The roof is going to be replaced but I have not gotten firm bids on material for a standing seam metal panel roof yet. This will be interesting as I have never installed one of those yet, but am willing to give it a go! The only thing that has me scratching my head is how to do the cricket for the chimney?

I'll post a pic of the place before and after the paint. Be sure to check back!